INSTRUCTORS:
Address
Plot 2632, Princess Road -Kimbejja Namugongo Division, Kira Municipality View mapCategories
PDO TrainingPROGRAM UNIT PDO 208: Smart, Easy Travel and Behavior
Session 1: Travel Documents
Session 2: Easy and Safe Travel
Session 3: Return and Reintegration
PROGRAM UNIT PDO 208: Smart, Easy Travel and Behavior
| Suggested Total Duration: 10 Hrs | |
| Suggested Duration | Session |
| 2 Hrs | Session 1: Travel Documents |
| 5 Hrs | Session 2: Easy and Safe Travel |
| 3 Hrs | Session 3: Return and Reintegration |
Module Aims
By the end of this module, participants should be able to:
- Explain and detail the different travel documents and their importance.
- Explain all the procedures and rules to be followed while taking a flight from your home country to another country, including:
- Preparing a checklist of items to be packed both in check-in and hand luggage.
- Check-in and airport procedures.
- Items that are banned on international flights.
- Dos and don’ts while on the flight.
- Explain the process of return and reintegration.
Session 1: Travel Documents
Session Objective
By the end of this session, participants should be able to:
- Know the different travel documents needed in the migration journey.
- Understand the features of the various documents.
- Know the importance of the various documents.
- Know the validity of the various documents.
| Suggested Duration | 2 Hrs |
| 1 hr Various Travel Documents
30 min How to Obtain the Documents 30 min Validity of Documents |
|
| Methodology Presentations, case study, brainstorming, and discussion. | |
| Facilitator Materials: Passport, entry visa, work permit/employment visa, medical certificates/ vaccination cards, flip charts, markers, and video clips. | |
| Participants Materials Copies of the slides or takeaway notes. | |
Session Activities
- Ask participants to think about the documents they need to prepare before travelling to the COD. What documents have they already prepared?
- Deliver the lecture “Documents needed to travel to the COD”. While speaking about each document, refer to the pictures of the passport, entry visa, work permit/employment contract, and medical certificate/vaccination card.
- Have and use examples for each document that will be discussed. Check with all participants that they have all the documents and understand the importance of each.
KEY SESSION READING MATERIAL
Travel Documents
During travel, the migrant is required to have a series of documents for him/her to be allowed to travel to the destination country.
- Passport – A passport is an identity document issued by the government of Uganda through the Ministry of Internal Affairs – Directorate of Citizenship and Immigration Control, allowing that person to travel abroad and re-enter their home country.
Your passport belongs to you and only you should decide what happens to your passport. If your employer or agent needs your passport for immigration matters, you can authorize that person to keep your passport for that purpose and for a limited time. It is advisable to get a confirmation letter/consent letter from that person. The passport must be returned to you. However, there are cases where the PRA meets all the expenses of processing your passport; you should have an understanding with the PRA on and under what terms you should get your passport. However, much as the PRA pays and processes the passport for a migrant worker, the passport still remains a personal document and property of the migrant.
If your passport is lost, you should report to the police in order to obtain a new passport. If it is lost in the possession of your employer or PRA, they have to meet the expense of the replacement.
- Medical Certificate – This is a certificate that ensures that you are healthy or have not contracted any contagious diseases prior to departure. You will be subjected to another medical check-up and receive another certificate when you arrive in the country of destination. This practice is common in the GCC countries.
- Entry Visa – The visa is the document or stamp in your passport allowing you to enter the destination country. Entry visa varies in period from one (1) month to two (2) years in different countries. Some countries have stamps put on your passport while others have an independent printed document.
- Work Permit – This is a legal document issued by a government to a non-citizen allowing them to work in the respective country under a set of prescribed conditions. The work permit is a sticker that is placed inside your passport. The employer’s named in your work permit must be the same employer’s name in the contract you signed, as only this employer is legally recognized by the country of destination. Work permits have a time limit, and your employer is responsible for the renewal.
- Labor Card/Work Card – This is an identity card offered to you authorizing you to work and stay in the country of destination. You can only obtain a labor card once you have a work permit.
- Vaccination Card – Different countries have specific vaccination requirements; the migrant worker has to ensure they have genuine and valid vaccination cards. Trainers should confirm the requirements of the COD of the migrants to provide accurate information.
Validity of Travel Documents
- The Uganda Passport is valid for 10 years.
- Medical Certificate – Valid only for purposes of processing a visa. The migrant might be subject to other medical examinations in the COD.
- Entry Visa – This is valid for a minimum of three (3) months and maximum of six (6) months depending on the laws of the COD.
- Work Permit and Labour Card – These are valid for a minimum of one (1) year, and also depending on the laws of the COD.
- Vaccination Card – Depending on the type of vaccination, this may vary from one (1) year to ten (10) years.
Note: The facilitator is advised to have copies of the various documents in respect to the COD and as well as requirements for vaccination and medical certificates.
Session 2: Easy and Safe Travel
Session Objectives
By the end of this session, participants should be able to:
- Know how to prepare for their flight.
- Understand the different restrictions and regulations of airports and flights.
- Know the etiquette required of them when they are traveling.
- Understand the different procedures of both departing and arrival airports.
- Know what to pack and not to pack for travel.
- Learn the dos and don’ts.
| Suggested Duration | 5 Hrs |
| 1 hr Checklist before Departure
1 hr Airport and Flight Procedure 1 hr At the Departure Airport 1 hr On the Plane 1 hr At the Destination Arrival Airport |
|
| Methodology: Presentations, guest speakers, experience sharing, Q&A, and brainstorming. | |
| Facilitator Materials: Flip charts, markers, and video clips. | |
| Participants Materials: Copies of the slides or takeaway notes. | |
Session Activities
- Explain the rules governing airport and flight procedures (e.g., luggage restrictions).
- Explain the requirements from a migrant at the COO departure airport (time issues, authorities and documents required).
- Explain the expected etiquette from passengers on the flight.
- Explain the requirements from a migrant at the COD arrival airport.
- Experience sharing from previous travelers on their experience at the departure airport, flight, arrival airport and inland travel in the COD.
KEY SESSION READING MATERIAL
Easy and Safe Travel
- Checklist before departure
Explain what the migrants must absolutely ensure is accomplished before they leave for the destination country:
- Make sure that the job designation or category mentioned on your visa matches the job that you have been recruited for.
- Remember to pack both your original documents and their copies. Also, leave more copies at home before you depart.
- Keep the originals always with you or in your hand baggage. They may be required at check-in and Airport Immigration counters.
- Note down all the phone numbers and other contact details of the Ugandan Mission/Embassy in the country you are going to.
- Make sure your passport is valid for at least six months.
- Always keep copies of your passport and visa with you.
- Get a copy of the employment contract co-signed by you, your foreign employer, and the PRA.
- You need to open a bank account with any bank in Uganda. Open a savings account. Note down the SWIFT/RTGS codes of the branch.
- Airport and flight procedures
Explain what the permitted luggage on most airlines is, what items can be carried in hand luggage or in check-in luggage and emphasize the items that are prohibited. Explain what items must be packed. Also, give details of the procedure the migrant must follow once they arrive at the airport: go inside, go through immigration, take the flight and land in the destination country.
- Luggage
You can take two types of luggage with you on a flight
- One piece of ‘hand baggage’— this is what you can carry with you inside the plane. It should not weigh more than 7kg. Check with your airline in case you need any clarification.
- Ensure that your hand baggage is not larger than 45 cm (17 in) x 40 cm (15 in) x 30 cm (12in). Check with your airline in case you need any clarification.
- ‘Check-in baggage’ or ‘checked baggage’ goes into the plane’s baggage compartment and can be more than one bag or suitcase, depending on the luggage weight allowed by the airline. You will get your luggage back once you reach your destination.
- Ensure that your checked baggage is not larger than 95 cm (38 in) x 75 cm (30 in) x 45 cm (18 in) in size. Check with your airline in case you need any clarification.
- Check the weight limit for check-in baggage when you are booking your ticket. Different airlines have different limits depending on where you are going.
- Remember to clearly write your name and contact details on all your suitcases.
- Ensure that you lock each and every bag you are carrying and keep the key safely in your personal bag.
- When you check in at the airport, the person at the counter will give you a boarding pass with your seat number.
- In case you have any check-in luggage, they will also put a tag on your luggage and a sticker on your boarding pass. Keep this safe; you will have to show it to the airport authorities if you cannot find your luggage after you land at the destination.
- It is best to keep valuable items with you in your hand baggage.
- Prohibited Items
Airlines are very strict about what you cannot carry on a flight. Please make sure that you do not pack any of these items. For more details, contact the airline and ask what items are banned both in check-in and hand baggage. There are also advertisement boards near airline counters listing banned items when you check in your luggage. Always obey the rules.
Items prohibited in hand baggage:
- Lighters, matches.
- Metal scissors.
- Blades, such as box/paper cutters, axes, meat cleavers, picks, swords, knives (except for plastic knives) and razor blades (safety razors are allowed).
- Bats and sticks, such as baseball bats, hockey sticks, cricket bats, golf clubs, etc.
- Guns or firearms of any type (including air guns and BB guns, ammunition bullets, pellets
- parts of guns or even toy guns).
- Any other weapons or self-defense items.
- Tools, such as hammers, drills, saws, screwdrivers, pliers, etc.
- Kitchen utensils.
Prohibited in both hand baggage and check in baggage
- Guns, firearms, ammunition, and explosives of any kind.
- Flammable items, such as lighter fluid, petrol, kerosene, oil, gas, etc.
- Liquids, sprays, or gels of any kind (the only exception is for medicines, and you should make sure you pack them in clear plastic cases).
- Chemicals, such as bleach, chlorine, paint, etc.
- For some airlines, lithium, ion batteries (e.g., large power banks) are forbidden both as checked and carry-on baggage.
- Tobacco products (this depends on the country; but to be safe, do not pack them).
- Poisonous substances, such as insecticides and pesticides.
- Plant and animal products (this depends on the country you are going to, but it would be a good idea to avoid carrying them, just to be safe).
- Pork or alcohol products, especially for GCC countries.
- Pornographic material.
- What you should pack
Hand baggage/Luggage
- Keep all your original documents and at least one copy of each in your hand baggage.
- Employment contract.
- Work permit.
- Other identification (driving license, National ID card, etc.)
- Medical certificates, immunization, vaccination, dental and other health records.
- School/college certificates.
- Medical prescription (in case you are carrying any medicines/drugs as prescribed).
- If you have a driving license, you can also carry this along with you.
- You can also carry trade or professional certificates with you.
- If a doctor has told you to take certain medicines regularly, you should carry those in your hand baggage as well so that you can take them on the flight if needed. Always also carry the prescription.
- Migrants with prescription medicine are advised to bring along supporting documentation (e.g., ID cards, letters from doctors). Please note that there may be restrictions at the destination on the types and volume of medicines that can be brought along.
- Money and valuables such as jewelry should be kept in your hand baggage.
- Carry something warm to wear on the plane (the air-conditioning can get very cold).
- Carry a set of clothes, so you can easily change your clothes without unpacking your check-in luggage.
Check-in Luggage
- Pack clothes to wear in the destination country.
- Light but modest clothing is best since the weather in the Gulf countries is warm for most of the year. However, also carry one or two warm clothes (e.g., a light sweater) for the winter.
- Pack personal care products such as a toothbrush, toothpaste, soap, sanitary towels, petroleum jelly or lotion, etc.
- You can also carry a few small personal items like photographs of your family and friends or other things that remind you of home.
At the Airport
- Make sure you arrive at the airport at least three hours before your plane is supposed to leave.
- Make sure you have your passport, visa, and flight ticket in hand. You have to show them to the guard at the entrance of the airport.
- Get your check-in baggage scanned by airport security as mandated.
- Go to the check-in counter of the airline to get your boarding pass (which will have your seat number) and your emigration form, and also submit your check-in luggage there. If the check-in luggage is over the weight limit, you will be charged extra. Or asked to give it to someone to take it back or leave it behind. It is advisable you weigh your bags before you reach the airline counter.
- Fill out the embarkation card and go to the immigration counters. Hand the card over to the officials there and show your passport, visa, and boarding pass. If there is no problem, they will put an exit stamp (it has the date of departure) on a page of your passport.
- Next, the airport security will check your hand baggage and a security officer will check that you are not carrying anything dangerous. He/she will stamp your boarding pass if everything is fine. Please check the date, and always ensure that you do not lose the tags on the hand baggage.
- Wait in the departure area for the flight announcement. There are a number of gates; the one for your flight should be mentioned on your boarding pass.
- Go through the boarding gate, show the airport staff/guards your boarding pass and enter the plane. Find your seat (the number is on your boarding pass) and sit down. You can put your hand baggage in the compartment above your seat or under the seat in front of you.
- Always check with the airport staff if you are confused about anything or have any questions about airport procedure.
- For safety’s sake, do not take any luggage or parcels from strangers. Also, always keep an eye on your luggage while at the airport.
- Take note of the gate number and boarding time which are mentioned on the boarding pass.
- If possible, call your family members after you complete all the formalities and then wait for boarding at the gate specified on the boarding pass.
On the Plane
- When the plane is going to take off, you will be asked to stay in your seat and put on your seat belt (the Fasten Seat Belt sign will be on).
- Once the plane is in the air, the Fasten Seat Belt sign will go off, and you are free to take your seat belt off and move around the plane if necessary (for example, if you need to go to the toilet).
- Whenever the pilot switches on the Fasten Seat Belt sign again, you have to make sure you are in your seat and wearing your seat belt.
- Sometimes, the movement of the plane could cause a feeling of pressure and pain in your ears. This is normal, and you can counter it by swallowing, yawning, or sucking on sweets and toffees.
- Talk softly to one another.
- From the time the plane takes off till the time it lands at the destination, you should keep your mobile phone, laptop and other electronics switched off or in airplane mode (if you cannot find an airplane mode, just switch it off). That means you cannot make calls or send messages during the flight.
- You will be given food and snacks by the airline staff.
- Vegetarian food will be available, and you should ensure that you make your preferences clear to the cabin crew.
- If you are non-vegetarian and would like halal meat, this will also be available on the flight.
- Please ensure that you ask the cabin crew for the same.
- Listen carefully to the instructions given by the airline staff at the beginning of the flight. They will tell you what to do in case of an emergency such as a crash landing.
- After the plane lands, you can get up and take your hand baggage.
- Try not to bump into people or push people; wait for the people in front of you to get off the plane first.
5.2.3.1 Hand
Dos and Don’ts of Behaving on an Airplane
| Dos | Don’ts |
| Keep your boarding pass, passport, and visa safe at all times. | Do not shout or play loud music inside the plane. |
| Wait for the seat belt sign to be switched off before you get up from your seat. | Do not push your seat too far back since this would be uncomfortable for the person sitting behind you. |
| Make sure you either turn off your mobile phone and other electronic devices or put them in airplane mode during the flight. | Do not take pillows or blankets from other seats.
Ask the airline staff if you have not got a pillow or blanket. |
| Be polite to other passengers. Try not to bump into people or push people while getting on or off the plane. | Do not smoke or chew tobacco on the plane. |
| Remember to lock the toilet when you are using it. | Do not spit anywhere except in the washbasin in the bathroom. |
| Make sure you keep the toilet clean after using it. | Do not try to be the first to get off the plane; wait for people in front of you to get off. |
| Make sure you have your hand baggage and
all your belongings with you before leaving the plane. |
Do not lean on other people while sleeping. |
| Keep your belongings close to you. | Do not kick the seat in front of you or let your children kick the seats in front of them. |
| Listen to the airline staff’s instructions carefully. | Do not stand in the space between seats and block other people. |
| Make sure you drink enough water. | Do not get drunk on the flight. Do not drink too much alcohol |
| Make sure your bag does not hurt other
travelers. |
Do not disrespect other people’s personal space. |
| Put your things in the locker above your seat or under the seat in front. | Do not be rude to co-passengers and airline staff. |
| Wear comfortable, clean, and warm clothing. | |
At the Destination Country Airport
- After you leave the plane and enter the destination airport, you will have to go through ‘Immigration’.
- Show your passport and visa to the immigration officer, who will put an entry stamp on the passport. The entry will have the date of arrival.
- Answer politely any questions the immigration officer asks you (also, keep your employment contract ready in case it is asked for). Note: Your baggage will be checked to make sure that you are not carrying any banned items (weapons, narcotics/drugs, pork products, etc.).
- Then go to ‘Baggage Claim’ to collect your check-in luggage (if you have any). Please note the belt number to pick up your luggage. It is announced in the flight upon arrival and displayed on screens near baggage belts.
- Remember to keep your passport and boarding pass with you always. The boarding pass should have the receipt for your check-in luggage stuck on it.
- The luggage from the plane will be unloaded on a moving belt. There will be many belts; find the one that has your flight number on the board near it (you can always ask the airport staff for help).
- Wait for your luggage to appear and take it off the belt.
- Then you can leave the airport. If your PRA has arranged for someone to pick you up, they will be waiting there. Again, you can always ask the airport staff or security for help if you need anything.
- In case you cannot find your check-in luggage at Baggage Claim, go to the airport staff and ask for help. Show them your boarding pass and the receipt sticker for the check-in baggage. They will give you instructions on what you should do.
- After you collect your luggage, proceed to the exit gate.
- The person who is coming to receive you will only be able to meet you outside the airport. Do not panic if you cannot see them as soon as you disembark from the plane.
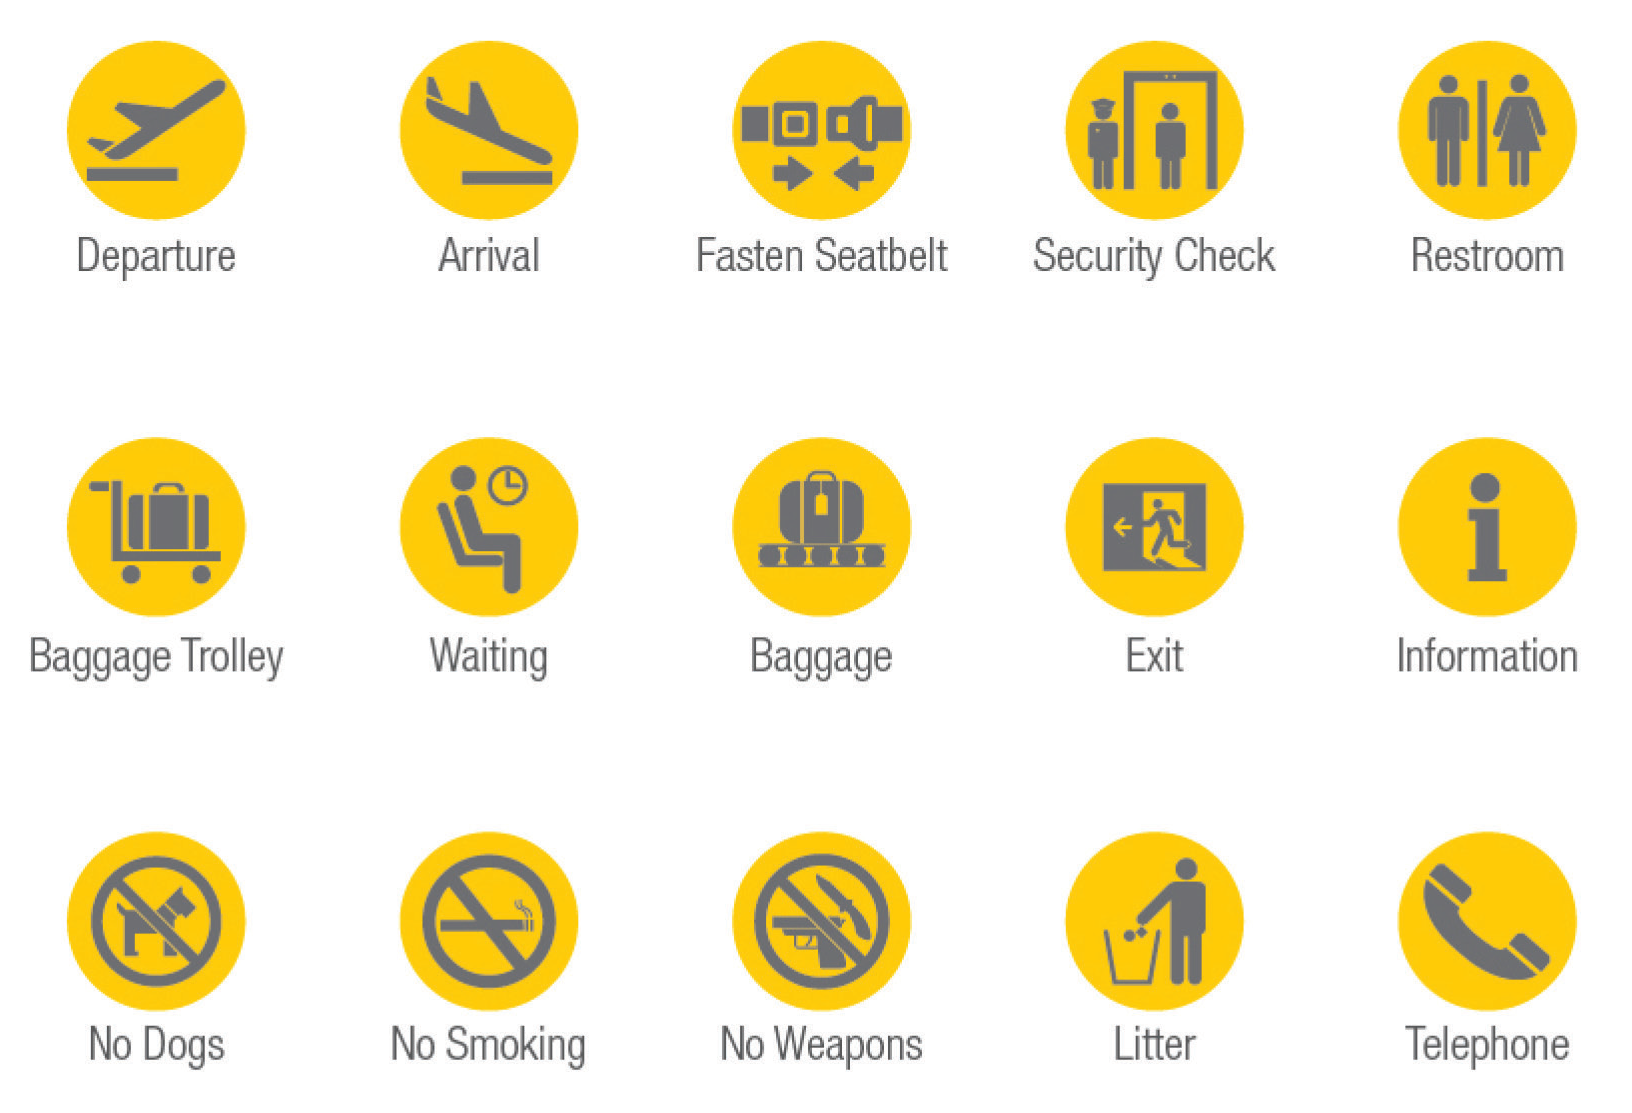
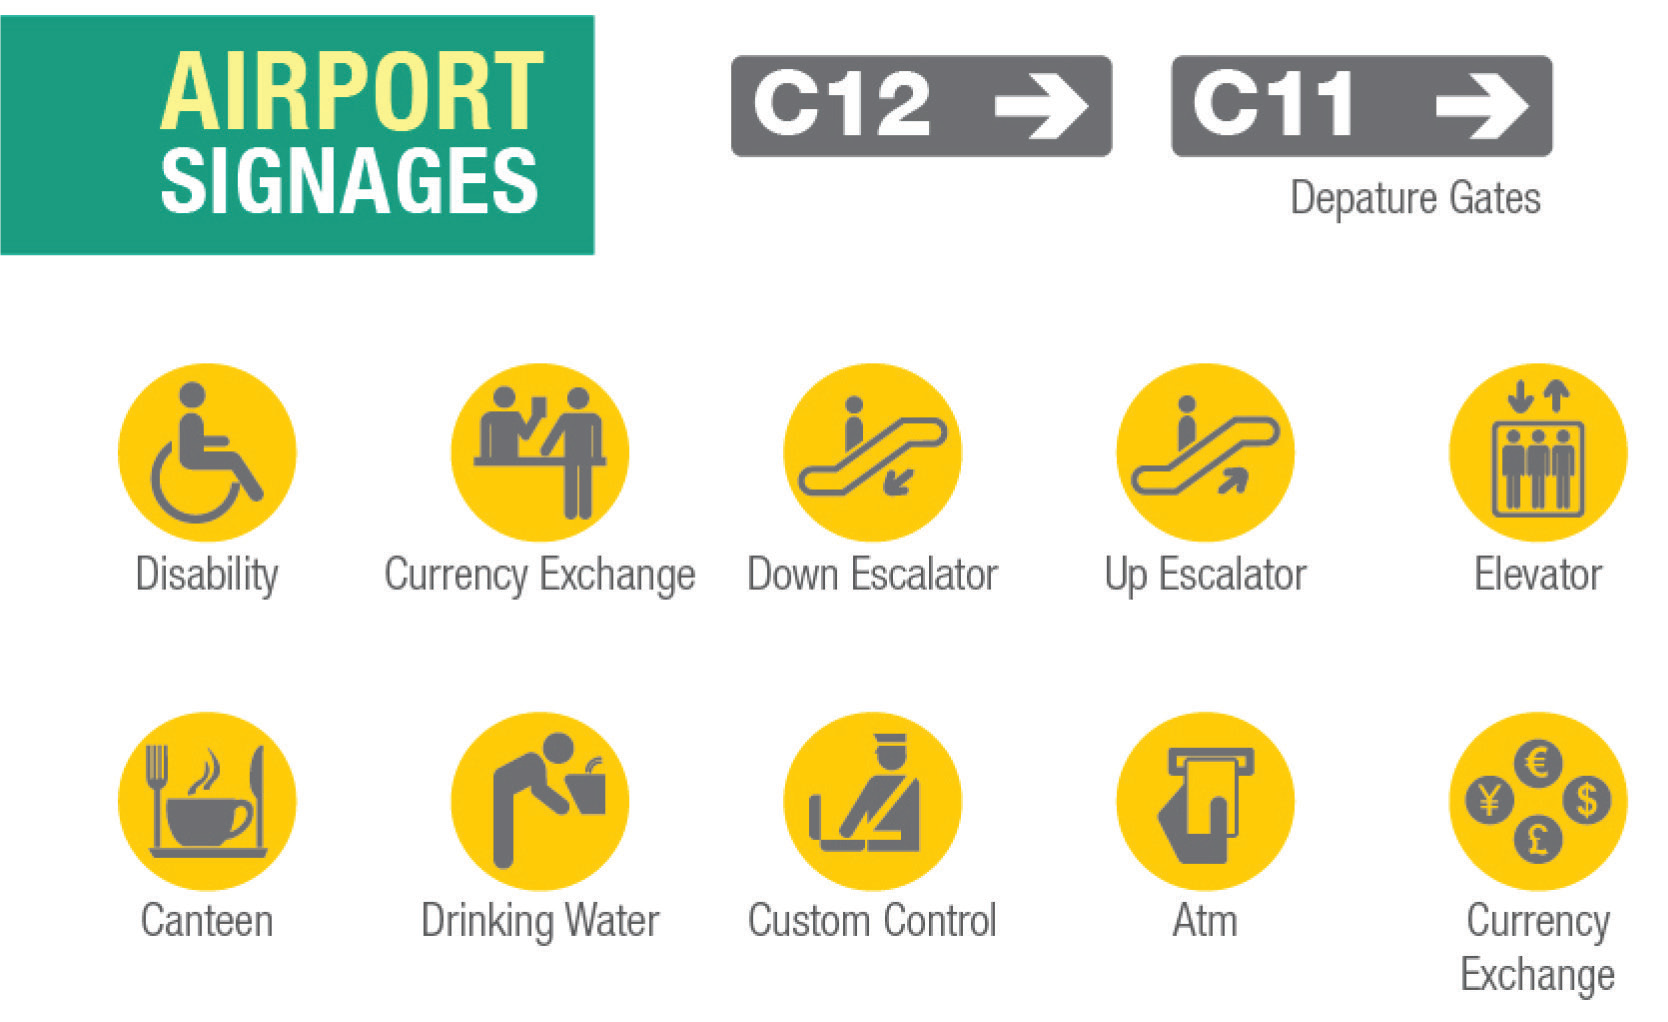
Common Signs at the Airport
Session 3: Return and Reintegration
Session Objectives
By the end of this session, participants should be able to:
- Explain what procedures and steps a migrant needs to follow while and after returning from the foreign country.
- To list and explain the common problems that returning migrants face.
- Explain the travel procedure for their return.
| Suggested Duration | 3 Hrs |
| 1 hr Preparing Before Return
1 hr Journey Back Home 1 hr Problems faced by Returnee Migrants
|
|
| Methodology: Presentations, and guest speakers. | |
| Facilitator Materials: Flip charts, markers, and video clips. | |
| Participants Materials: Copies of the slides or takeaway notes. | |
Session Activities
- Experience sharing from a former returnee migrant worker on how he/she prepared for return.
- Explain the ideal process on the migrant’s journey back to the COO.
- Explain the challenges/problems retuning migrant workers are likely to face.
- Experience sharing from a former returnee migrant worker on the challenges/problems he/she faced when they returned.
- Brainstorming on how participants are likely to manage and overcome the possible challenges/problems faced by returnee migrant workers.
KEY SESSION READING MATERIALS
Preparing Before Returning Home
Explain the procedure that needs to be followed when the period of employment is over and there is need to return home.
- Complete your work commitments and inform your employer before you leave the country.
- You must leave the country you are working in before your visa expires; if you applied for an extension of your visa and it was rejected, you have to leave the country.
- Once the term of the employment contract is over, your employer is supposed to arrange for your travel back to Uganda and pay for the air ticket, according to the Emigration Act.
- You need to get a NOC from your sponsor/employer before leaving the country of employment.
- Your employer will have to pay you your final wages along with any other unpaid dues.
- You should withdraw any money left in your bank account in the country you are working in (if you opened an account in a bank there).
- Transfer the money to your bank account in a Uganda bank or send it home through any of the other methods that were explained in Module 7 on remittances.
- Make sure you have your original documents (passport, visa, etc.) with you. If your employer has your original documents and is unwilling to return them, contact the Ugandan Mission/Embassy immediately and register a complaint.
- If applicable, ensure that you obtain letters of certification which enumerate the skills you learnt and the work experience that you gained during your employment.
The Journey Back Home
Explain what it takes while returning to Uganda. Refer to the previous modules connected to safe and easy travel including highlighting what is prohibited on the flights.
What to pack
- Make sure you have all your original documents with you (passport, NOC, visa, etc.) along with photocopies of the same.
- If you are carrying foreign currency worth USD 10,000 or more, you must declare it at the airport in Uganda and sign a form to that effect.
- You can carry used personal and household items like kitchen utensils and small electronics (for large appliances like TV sets and fridges bigger than 300 liters, you will have to pay import duty if you are bringing them to Uganda).
What you cannot bring home
Refer to module on prohibited items for items not to carry on the flight.
Additionally, while returning to Uganda, you are not allowed to bring the following items:
- Firearms or weapons of any kind.
- Ammunition for firearms.
- More than 100 cigarettes or more than twenty-five cigars or more than 125 grams of tobacco.
- Gold or silver except in the form of jewelry.
- More than two liters of alcohol or wine. Also, unless you buy this alcohol in the duty-free section of the airport in your employment or home country, remember that all liquids should be packed in your check-in luggage, not your hand baggage.
For the following items, you will have to pay import duty:
- Color TV.
- Fridge of capacity greater than 300 liters.
- Video camera.
- Gold or silver that is not in the form of jewelry
Problems Faced by Returning Migrants
Provide an idea of the problems migrants might face in reintegrating into society once they return.
- Migrants returning home often find it difficult to reintegrate into their communities. They may not make the best use of their skills or their savings.
- After getting used to higher wages in the foreign country, workers may struggle to find jobs at home that they can accept.
- The worst affected are the victims of trafficking who will return with no funds and may not be readily accepted back into their home communities.
- Migrants may struggle to fit in with families and communities upon their return if they have been away for a long time and have got used to the culture and lifestyle in another country.
- Just like you may have missed your home when you first went abroad, you might find yourself missing the foreign country and your way of life there once you return.
- You may have saved a considerable amount of money while working abroad but you need to put it to good use once you get home. Lack of knowledge on how to use one’s savings well is a big issue for many returning migrants.
- Migrants, even if they have developed skills while working abroad, may not have any certified skills, which can make it difficult to re-migrate to another country after returning home.
How to deal with the problems
- You have to accept that your relationship with your family, especially your husband/wife and children, will have changed if you have been away from them for a long time. It is important to spend time talking with them to rebuild these relationships.
- Reach out to friends, relatives and people in your community who have migrated abroad for work before; they can give you advice and help on fitting back in.
- Reach out to your extended network of friends and family for employment-related opportunities or help on starting a business and investing your savings wisely.
- There are organizations working on rehabilitation of returning migrants; they are privately owned but work in collaboration with the Government and UAERA, and they include RAHAB Uganda.
PDO 208
ENROLL NOW

